The magic of embroidery goes beyond colorful threads and intricate patterns. It starts with the unseen but crucial process of digitizing – transforming a digital image or design into a language your embroidery machine understands. This guide delves into the world of digitizing for embroidery, equipping you with the knowledge to bring your creative visions to life, stitch by stitch.
What is Digitizing for Embroidery?
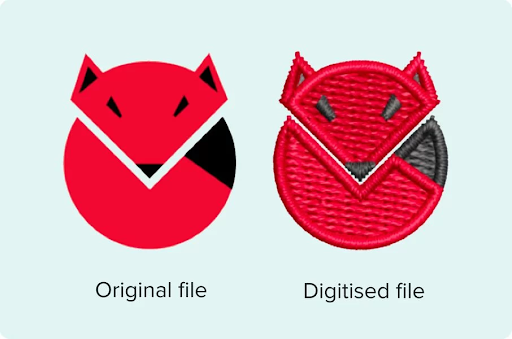
Imagine a translator who converts written words into another language. Embroidery digitizing plays a similar role. It takes a digital design, typically an image file like a .jpg or .png, and translates it into a specific set of instructions for your embroidery machine. This instruction set, called an embroidery file (often in .dst, .pes, or .emb format), dictates:
-
Stitch types
Different stitches achieve different effects. Satin stitch fills large areas, while satin stitch with long and short stitches creates a textured look.
-
Stitch density
This determines how closely stitches are packed together, affecting the design’s detail and stability.
-
Thread colors
The digitizer assigns a specific thread color to each area of the design.
-
Stitch order
The sequence in which stitches are created is crucial for a smooth and professional finish.
Why is Digitizing Important?

Digitizing for embroidery is essential for several reasons:
-
Machine Communication
Embroidery machines rely on digital instructions to operate. Without digitizing, your machine wouldn’t know where or how to place stitches.
-
Stitch Optimization
Digitizing software optimizes stitch types and densities for different design elements. This ensures a high-quality finished product and minimizes thread breaks or puckering.
-
Color Accuracy
Proper digitizing translates your design’s colors into the most appropriate thread colors available.
Who Can Digitize for Embroidery?
There are three main options for creating embroidery files:
-
Do-It-Yourself Software
Embroidery software packages like Wilcom, Hatch, or Embird offer digitizing tools. This is ideal for experienced users who want control over their designs. However, it requires learning the software and understanding embroidery techniques.
-
Professional Digitizers
Many embroidery shops or freelance digitizers offer their services. This is a great option for complex designs or for those who prefer a hands-off approach.
-
Free or Paid Online Digitizing Services
Several online platforms offer basic digitizing services, often focused on simple logos or text. Be aware of limitations and potential quality issues with these options.
Factors to Consider When Choosing a Digitizing Method:
-
Complexity of your design
Simple designs might be manageable with basic software, while intricate details require professional expertise.
-
Budget
Do-it-yourself software can have a higher upfront cost, while professional digitizing incurs per-design fees.
-
Time Commitment
Learning digitizing software takes time. Consider the learning curve and how quickly you need your design digitized.
Exploring the Embroidery Digitizing Process:
Once you’ve chosen your digitizing method, let’s explore the general process:
1. Design Preparation
Ensure your chosen image is high-resolution and clear. For complex designs, simplify elements to translate well into embroidery.
2. Software Setup
If using software, familiarize yourself with the digitizing tools. These typically include functions for:
* Object creation
Defining different areas of your design that will be stitched with different colors or techniques.
* Stitch selection
Choosing the appropriate stitch types for different design elements.
* Underlay
Creating a base layer of stitches for stability, especially on detailed or thin areas of the design.
* Trims
Defining where the machine trims excess thread between color changes.
3. Digitizing
This involves meticulously outlining shapes, assigning stitch types and colors, and setting stitch densities.
4. Test Stitching
Once digitized, create a sample stitch-out on a piece of scrap fabric. This allows you to identify any errors in the digitizing or adjust thread colors before stitching the final project.
Tips and Tricks for Successful Digitizing:
-
Minimize Color Changes
Frequent color changes can be time-consuming on the machine. Consider using fewer colors or blending techniques to achieve a similar effect.
-
Utilize Outlines
Outlines with a satin stitch or a dense fill stitch provide a clean and finished look to your design.
-
Pay Attention to Stitch Density
Dense stitches create a more solid look but can be bulky, while sparse stitches may not cover the fabric fully. Find the right balance based on the design element.
-
Start Simple
Begin with basic designs to grasp the digitizing process before tackling complex projects.
READ ALSO: dmcc free zone a global hub for trade and innovation
Conclusion:
The world of embroidery digitizing is a gateway to endless creative possibilities. With the knowledge and skills outlined in this guide, you’re well on your way to transforming your digital designs into stunning stitched creations. Remember, practice makes perfect, so don’t hesitate to experiment and explore different digitizing techniques. Embrace the learning curve, and soon you’ll be a master translator, bringing your artistic visions to life, stitch by beautiful stitch.